

WordPress full site editing lets you design your whole site, including the header, footer, templates and global styles, with the same blocks you already use in posts. It all happens in one place: Appearance → Editor, also called the Site Editor.
It arrived in WordPress 5.9 in January 2022. As of WordPress 7.1.4, it is a mature tool. Below are the six edits that cover most day-to-day work, and how to undo each one.
⚡ Quick answer
- Best for: blogs, portfolios and small business sites on a block theme that want to change layouts and design without code or a page builder.
- Skip it if: your site runs a classic theme with a page builder and works fine. The Site Editor only appears with a block theme.
- Time needed: about 30 minutes to learn the six screens; an afternoon to restyle a small site.
- Our call: learn it on a test copy first, change Styles before templates, and export a copy of your work before any theme switch.
Contents
- What is WordPress full site editing?
- What you need before you start
- Step 1: Check your theme and open the Site Editor
- Step 2: Set your site-wide Styles
- Step 3: Edit the header and footer
- Step 4: Edit a template
- Step 5: Create a custom template for one page
- Step 6: Save carefully and export a copy
- How do you check your changes worked?
- What breaks and how to undo it
- Frequently Asked Questions
- Should you use full site editing?
What is WordPress full site editing?
Full site editing (FSE) is the name for a set of WordPress features that move design out of PHP theme files and into the block editor. Instead of the Customizer, widgets and theme options, you get four building materials.
| Piece | What it controls | Where you edit it |
|---|---|---|
| Templates | The layout of a type of page: single posts, pages, archives, search, 404 | Site Editor → Templates |
| Template parts | Repeated areas such as the header and footer, shared by many templates | Site Editor → Patterns → template parts |
| Styles | Site-wide colours, fonts, spacing, layout widths and per-block defaults | Site Editor → Styles |
| Patterns | Ready-made groups of blocks you insert and edit | Block inserter and Site Editor → Patterns |
The mental shift is simple but important. Editing a post changes one piece of content. Editing a template changes the frame around every post that uses it.
WordPress.org’s Template Editor documentation puts it plainly: when you change a template, the editor updates the blocks on all posts and pages that use it.
If you are new to blocks in general, our roundup of Gutenberg blocks plugins shows how far the core block set can be extended before you need a builder.
The catch: FSE is a theme feature. On a classic theme you keep the Customizer and widgets, and the steps below won’t apply until you switch to a block theme.
What you need before you start
- WordPress 7.1.x (7.1.4 was current in November 2026). The steps below match the 7.1 interface; earlier 6.x versions place a few buttons differently.
- A block theme. Twenty Twenty-Five, the current default theme, is one. Our list of the best block themes for full site editing covers more designed options.
- An administrator account. The Site Editor changes the whole site, so it is an admin tool.
- A backup or a test copy. Pick a tool from our list of WordPress backup plugins if your host doesn’t take daily snapshots.
Common mistake: learning the Site Editor on a live business site. Template saves go live immediately, so practise on staging or a fresh local install first.
Step 1: Check your theme and open the Site Editor
Go to Appearance in the dashboard. With a block theme active, you’ll see Editor in that menu. If you see Customize there instead, your theme is classic.
Under the hood, WordPress treats a theme as a block theme when it ships a templates/index.html file next to its style.css. You don’t need to open those files; the Appearance menu tells you.
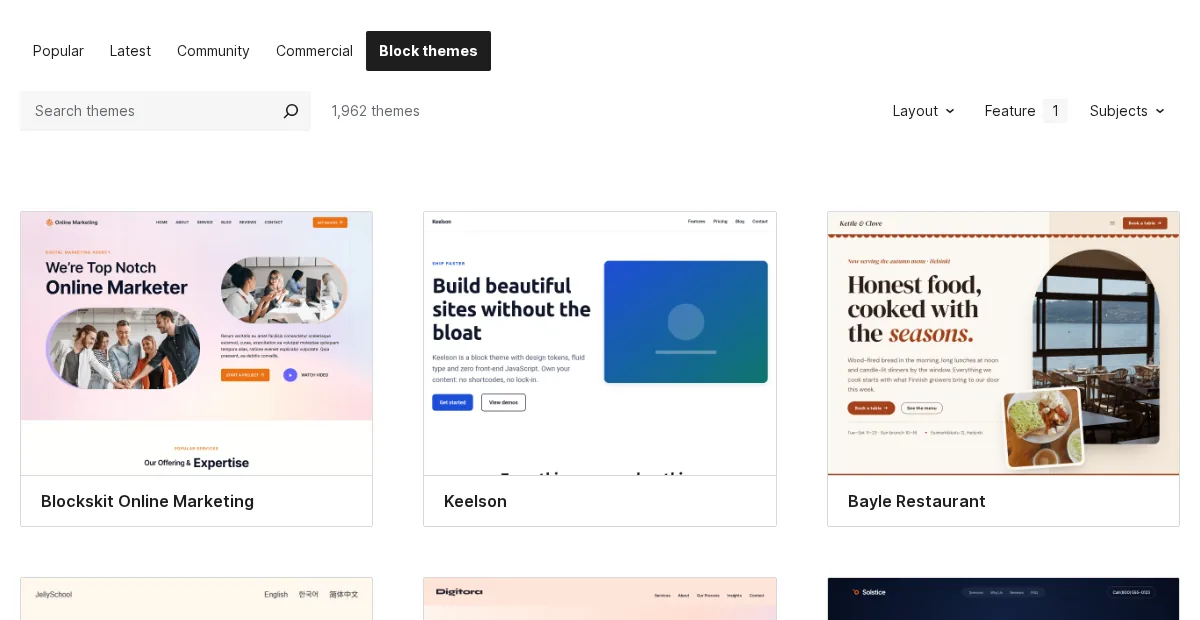
No block theme yet? Go to Appearance → Themes → Add New and filter by Block themes. The WordPress.org directory listed 1,962 of them in November 2026.
Click Editor and you land on the Design screen: a dark sidebar beside a live preview of your homepage. Nothing is editable yet; this screen is for navigation.
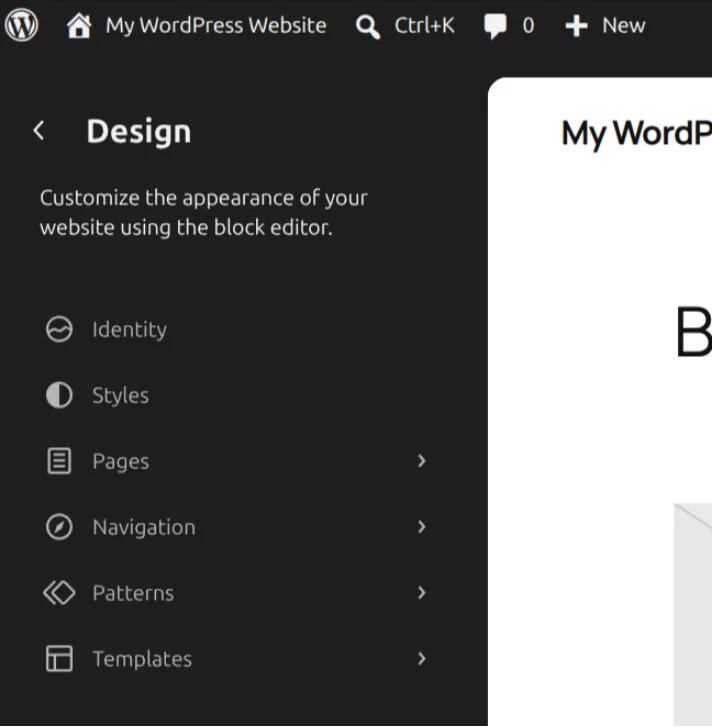
- Identity: site title, tagline, logo and site icon.
- Styles: colours, typography, layout and style variations.
- Pages: edit page content without leaving the Site Editor (available since 6.3).
- Navigation: your menus.
- Patterns: synced patterns and template parts.
- Templates: the layouts for every page type.
Since 7.1, the WordPress admin bar stays visible inside the Site Editor, and a back chevron replaces the old W logo as the way out.
Press Ctrl+K (Cmd+K on a Mac) to open the Command Palette and jump to any template by name.

Full details of every button are in the official Site Editor documentation, updated for 7.1.
Step 2: Set your site-wide Styles
Start with Styles, not templates. Styles change the look of every page at once, and they are the easiest layer to reset.
- Click Styles in the Design menu, or the half-filled circle icon at the top right while editing.
- Click Browse styles to try the theme’s style variations. Each one swaps colours, fonts and spacing in a click.
- Open Typography to set fonts for text, links, headings and buttons. Need a starting pair? See our guide to font combinations for web design.
- Open Colors to edit the palette and the default colours of the background, text, links, headings and buttons.
- Open Layout to set the content width, wide width, padding and block spacing.
- Open Blocks to restyle one block type everywhere, for example every Button or every Quote.
WordPress 7.1 adds two things beginners will notice. You can set Tablet and Mobile styles per block type, and hover, focus and active states for Button and Navigation Link blocks, all without CSS.
Per the 7.1 responsive styles dev note, the default breakpoints are 480px for mobile and 782px for tablet; your normal style stays the desktop base.
Turn on the Style Book while you work. It shows every block at once, so you see a change ripple across the site before you save.
Do this if you only want a new look. Many sites never need to touch a template. When a setting truly doesn’t exist, our guide to adding custom CSS in WordPress covers the Site Editor’s Additional CSS panel.
Step 3: Edit the header and footer
Headers and footers are template parts. Edit one once and every template that includes it updates.
- Go to Patterns in the Design menu. Template parts are grouped by area at the top of the sidebar: Header, Footer and General.
- Click Header, then the header you want, and click into the canvas to edit.
- Swap the logo with the Site Logo block, edit the menu with the Navigation block, and change colours on the outer Group or Row block.
- Click Save.
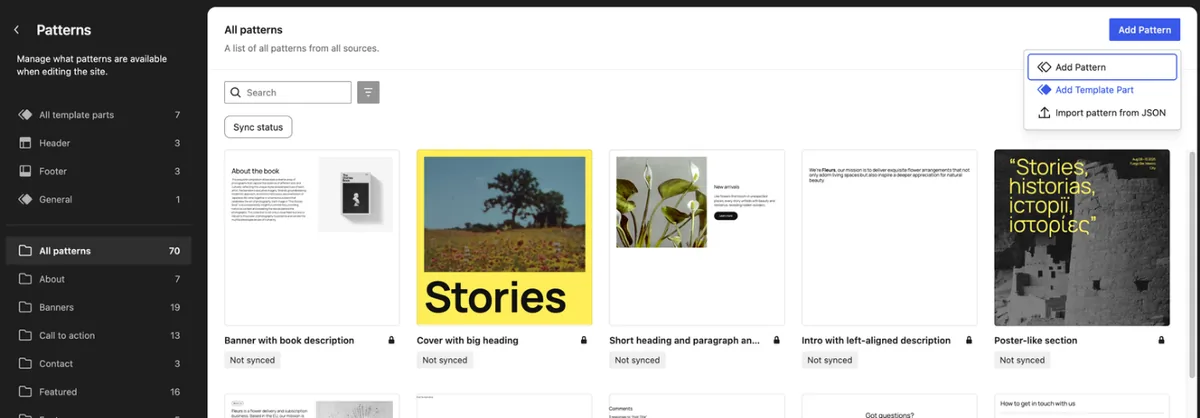
To create a new part, click Add Pattern → Add Template Part and choose an area: General, Header, Footer or Navigation Overlay, the area for a toggled menu overlay.
Moving from a classic theme? The Template Part block’s Advanced settings include Import widget area, which pulls in widgets you built in the old theme.
The catch: you can also edit a header while inside any template. That is convenient, but you are still editing the shared part, not a copy for that one page.
Step 4: Edit a template
Templates decide what each type of page shows. A typical block theme includes Front Page, Blog Home, Pages, Single Posts, All Archives, Search, 404 and Index, the fallback for everything.
- Click Templates. Each card shows a preview and a one-line description.
- Open Single Posts (the layout of every blog post).
- Make a change readers will notice, such as adding the Post Author or Post Date block under the title, or a Group with a call to action under Post Content.
- Use List View (the three-lines icon) to select nested blocks precisely.
- Click Save.
Two blocks do the heavy lifting in templates. Post Content is where each post’s text appears. Query Loop builds lists of posts on blog and archive pages.
Delete Post Content from Single Posts and every post on your site loses its body text on the front end. It is an easy accident to make.
Want more control over archives? Click Add Template to create layouts for a specific category, author, tag or date archive, or for a single named post.
Per the Template Editor docs, your edits take precedence over the theme’s bundled template files.
Best for: structural changes that apply to every post. For a one-off landing page, use Step 5 instead.
Step 5: Create a custom template for one page
A custom template is a layout you assign by hand, such as a full-width page with no sidebar or a landing page without the normal header.
- In Templates, click Add Template → Custom template.
- Give it a clear name, for example Landing page, no header, and click Create.
- Build the layout. Keep a Post Content block where the page text should go.
- Save, then open the page in the block editor. In the page sidebar, click the template name and pick your new template.
Changing one page’s template affects that page only. That makes custom templates the safe way to experiment with a layout without touching the rest of the site.
Skip it if you build landing pages in a page builder already. Our comparison of the best visual page builders for WordPress explains where builders still win on complex layouts.
Step 6: Save carefully and export a copy
The Save button is smarter than in the post editor. When several things changed, WordPress lists every template, template part, pattern, menu and style it is about to save, and you can untick any of them.
Read that list every time. If it shows Header when you only meant to edit one template, you changed the shared header.
Next, keep a portable copy of your work. Open the three-dot Options menu at the top right and choose Export under Tools.
You get a zip of your theme including the templates, template parts and styles you changed in the editor.
If you want those changes written into theme files, use the official Create Block Theme plugin, published by WordPress.org (version 2.10.2 in November 2026).
It can save editor changes to the active theme, create a child theme or a clone, and export a zip.
⚠️ Warning: Create Block Theme writes to theme files. Use it on staging or a local copy, never as a casual click on a live client site.
How do you check your changes worked?
- Log out or use a private window and load the homepage, one post, one page, an archive and a search result. Each uses a different template.
- Check mobile. Use the Preview menu in the editor, then confirm on a real phone, especially if you set Tablet or Mobile styles.
- Clear your page cache if your host or a plugin caches pages, or you may be looking at the old design.
- Measure speed on one changed page. Our guide on passing Core Web Vitals in WordPress shows how to read the result.
Common mistake: judging the front end while logged in. The admin bar and editor previews don’t always match what visitors see.
What breaks and how to undo it
| Symptom | Likely cause | Fix |
|---|---|---|
| Posts show a title but no text | Post Content block deleted from Single Posts | Reset the Single Posts template, or add Post Content back |
| Every page changed when you edited one | You edited a shared template part or the main Pages template | Check the Save list next time; reset the part |
| Theme update didn’t change a template | Your saved customization overrides the theme’s file | Reset that template to get the theme’s new version |
| Design gone after switching theme | Site Editor work belongs to the old theme | Switch back, export first, or rebuild in the new theme |
| Fonts or colours look wrong on one block | A block-level setting overrides Styles | Clear the block’s own setting or use Apply globally |
Four ways to undo, from lightest to heaviest
- Undo before you save. The curved-arrow Undo button in the toolbar reverses recent changes.
- Style revisions. In Styles, open the three-dot menu to browse revisions or choose Reset to defaults.
- Reset a template or part. In Templates, open the card’s three-dot menu and choose Reset. Custom templates you created can be deleted instead.
- Restore your backup. The only undo that covers everything at once.
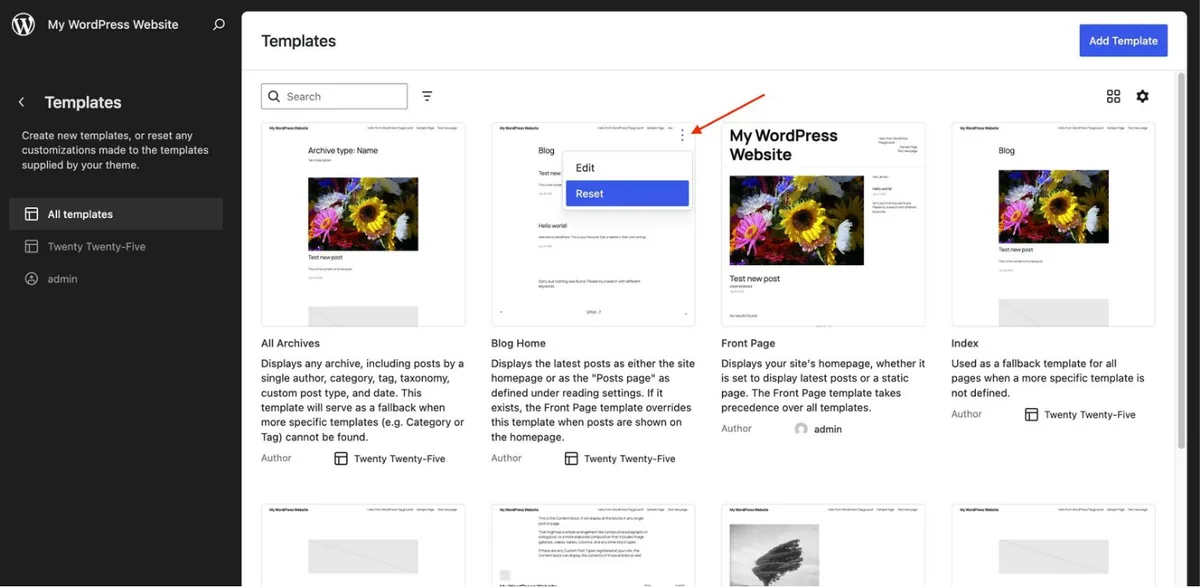
Reset only appears on templates you have changed; a template still in its default state has nothing to reset. Per the Styles documentation, Additional CSS survives theme updates but is cleared when you switch themes.
Frequently Asked Questions
What is full site editing in WordPress?
Full site editing is the set of WordPress features that let you edit your entire site with blocks, including the header, footer, page templates and global styles. You use it in Appearance, then Editor, with a block theme. It launched in WordPress 5.9 in January 2022 and is standard in 7.1.
Do I need a block theme to use the Site Editor?
Yes. The Site Editor appears under Appearance only when a block theme is active, such as the default Twenty Twenty-Five. Classic themes keep the Customizer and widgets. Some classic themes enable template editing from the block editor, but not the full Site Editor.
Can I use full site editing with a classic theme?
Only partly. A classic theme can enable template editing from inside the post editor, but the full Site Editor needs a block theme. To use every Site Editor screen, switch to a block theme on a test copy first and compare.
Is full site editing better than a page builder like Elementor?
It depends on the site. Full site editing is built into WordPress, needs no extra plugin, and suits blogs and simple business sites. Page builders still offer more visual control for complex layouts. If your builder site works, there is no urgent reason to switch.
Will updating my theme erase my Site Editor changes?
No. Templates and parts you customize are saved separately and take precedence over the theme’s files, so updates don’t overwrite them. The trade-off is that you won’t see the theme author’s improved version of that template until you reset it.
How do I undo changes in the Site Editor?
Before saving, use Undo. After saving, reset a template or template part from its three-dot menu in Templates or Patterns, and use Styles revisions or Reset to defaults for design changes. For anything bigger, restore a backup taken before you started editing.
What is the difference between a template and a template part?
A template is the full layout for a type of page, such as Single Posts or 404. A template part is a reusable area inside templates, usually the header or footer. Change a template part and every template that includes it changes too.
Is full site editing good for SEO?
It is neutral to positive. Block themes output standard core block markup, and you control heading structure in templates. Rankings still depend on content, speed and technical setup, so keep your SEO plugin, check one heading per page, and measure Core Web Vitals after redesigning.
Should you use full site editing?
- Use full site editing if you are starting a new blog or small business site, or already run a block theme. Styles plus a handful of template edits will carry most sites.
- Stay on your classic theme if it is fast, stable and built around a page builder. Switching themes is a redesign project, not a settings change.
- Test it on a copy if you are curious but cautious. Install a block theme on staging, rebuild your header and Single Posts template, and compare.
Our pick for most readers: learn the six steps above on a test site this week, then decide.
Still choosing a theme? Start with our expert picks of free WordPress blog themes and check SEO-optimized WordPress themes before you commit.
For everything else that changed in recent core releases, read our guide to what’s new in WordPress 7.0.
Last updated November 2026.