
To build an Elementor header and footer, you create two site part templates in Elementor Pro’s Theme Builder and publish them with a display condition.
Plan on 45 to 60 minutes. When you finish, every page on the site picks up the new design.
Below is the whole job: the current menu path after Elementor’s 2026 admin reshuffle, display conditions, a sticky header in both the V3 and V4 editors, and the usual reasons a header goes missing.
⚡ Quick answer
- Best for: Elementor Pro sites where the theme’s header options are too limited, or where you need a different header on landing pages or the shop.
- Skip it if: you only run free Elementor, or your block theme already gives you the header you want in the Site Editor.
- Time needed: roughly 45 to 60 minutes for one header, one footer and a sticky setup.
- Our call: build the header and footer together, set both to Entire Site, and add exceptions only where a page truly needs them.
Contents
- What does an Elementor header and footer replace?
- What you need before you start
- Step 1: Open the Elementor Theme Builder
- Step 2: Create and design the header template
- Step 3: Publish with display conditions
- Step 4: Build the Elementor footer template
- Step 5: Make it a sticky header (V3 and V4)
- How to use a different header on some pages
- How to check it worked
- What breaks and how to undo it
- Frequently Asked Questions
- Should you build your header in the Theme Builder?
What does an Elementor header and footer replace?
Without the Theme Builder, your header and footer come from the theme. With it, Elementor renders your template in the theme’s header and footer locations instead.
In plain English: the header template takes the place of the theme’s header.php output, and the footer template replaces footer.php.
Per Elementor’s Theme Builder documentation, the same screen manages every site part: Header, Footer, Single Post, Single Page, Archive, Search Results, Loop Item and Error 404, plus WooCommerce templates when a store is active.
Headers and footers are the easy win. Single post layouts are the next step, and our walkthrough on building a single post layout with Elementor uses the same Theme Builder flow.
⚠️ The catch: Theme Builder is an Elementor Pro feature. The Elementor listing on WordPress.org tags it “Theme Builder [Pro]”. Free installs only preview the Pro site parts. Our Elementor review covers what else Pro adds before you pay.
What you need before you start
- Elementor and Elementor Pro, both active and up to date. Elementor 4.4.1 was the current free release on WordPress.org when this was checked (November 2026).
- A standards-compliant theme. Elementor says the Theme Builder works with any theme that follows WordPress coding standards. On a block theme, the Site Editor is the native alternative.
- A WordPress menu already built under Appearance → Menus, because the header’s menu widget pulls from it.
- A logo set in Site Identity, so the Site Logo widget has something to show.
- The WordPress REST API left on. Elementor notes the Theme Builder stops working, templates included, if the REST API is disabled.
- A backup or staging copy. Swapping a header on a live site is reversible, but a broken footer on a busy day is not fun.
Running the new V4 editor? Read our Elementor V4 explainer first, because the sticky header method changes there. Still on V3 and planning the switch? Our guide to migrating an Elementor V3 site to V4 covers the order of operations.
Step 1: Open the Elementor Theme Builder
This is where most older tutorials send you to the wrong place. Starting in January 2026, Elementor moved its templates out of a separate WP Admin section and into the Editor menu.
- Current path: Elementor → Editor → Templates → Theme Builder.
- With Pro active: a Theme Builder shortcut also sits directly in the Elementor menu (Elementor → Theme Builder).
- Older installs: Templates → Theme Builder.
- From inside the editor: click the Elementor logo in the top-left of the panel, then Theme Builder.
- Keyboard: Ctrl+Shift+E on Windows, Cmd+Shift+E on Mac.
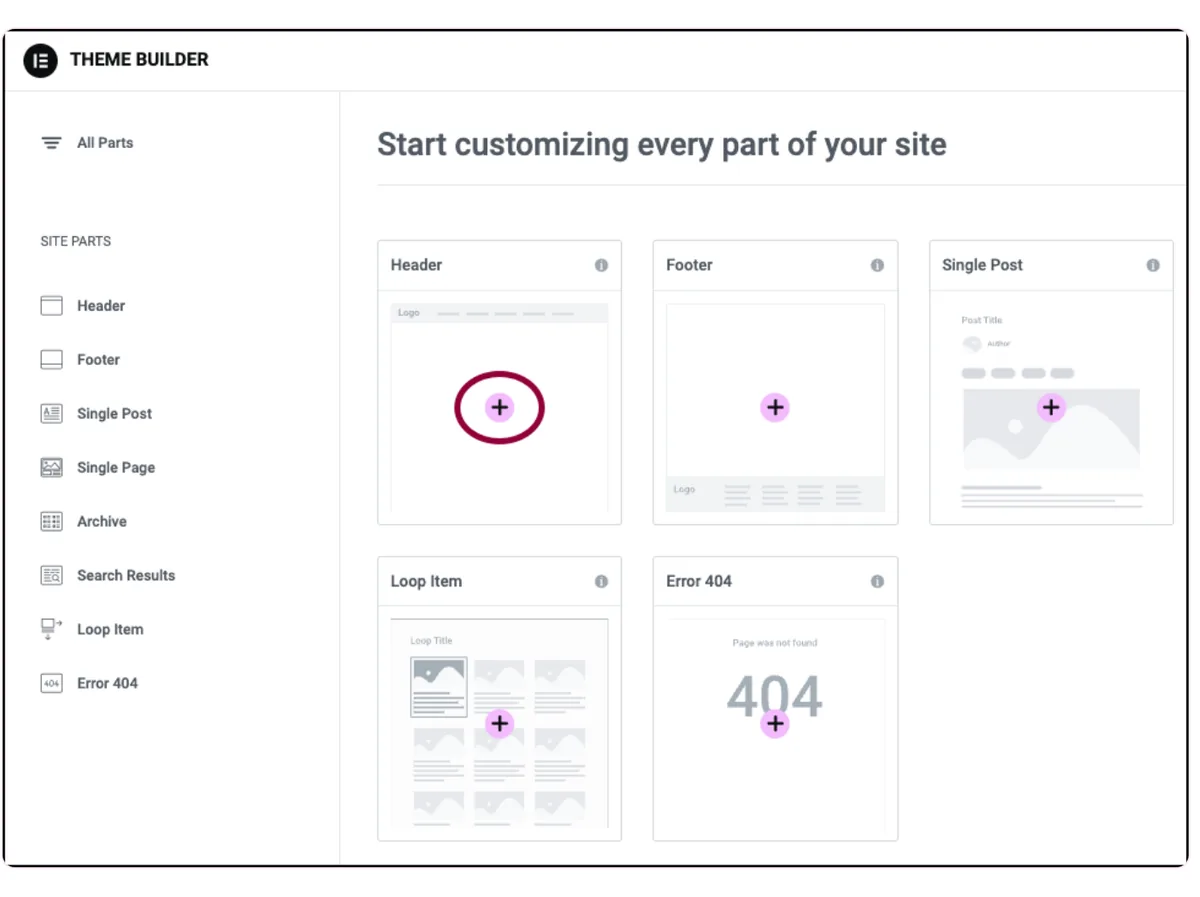
Each card on this screen shows a green dot when the template is live (it has display conditions) and a gray dot when it is still a draft.
Remember that dot. It answers most “why isn’t my header showing” questions before you touch anything else.
Step 2: Create and design the header template
Click the plus sign on the Header card. The Template Library opens with pre-designed headers. Pick one to save time, or close the library to start from a blank canvas.
A blank start is usually faster to clean up than a busy template.
Lay out the structure
Add one full-width container for the header bar. Inside it, use a row with three areas: logo on the left, menu in the middle or right, and one call-to-action button. That layout covers most business sites.
Common mistake: stuffing the header. A phone number, search, social icons, two buttons and nine menu items look fine on a 27-inch monitor and eat half a phone screen.
Add the logo and the menu
Drag in the Site Logo widget. It pulls the logo from Site Identity or the Customizer, so you change the logo once and the header follows.
Then add the WordPress Menu widget and pick the menu you built under Appearance → Menus.
In the menu widget’s Mobile Dropdown settings, set the Breakpoint (Mobile, Tablet or None) and switch on the hamburger Toggle Button.
For long menus on phones, a swipeable bar can work better than a dropdown; our tutorial on a horizontal scrollable menu in Elementor for mobile shows that pattern.
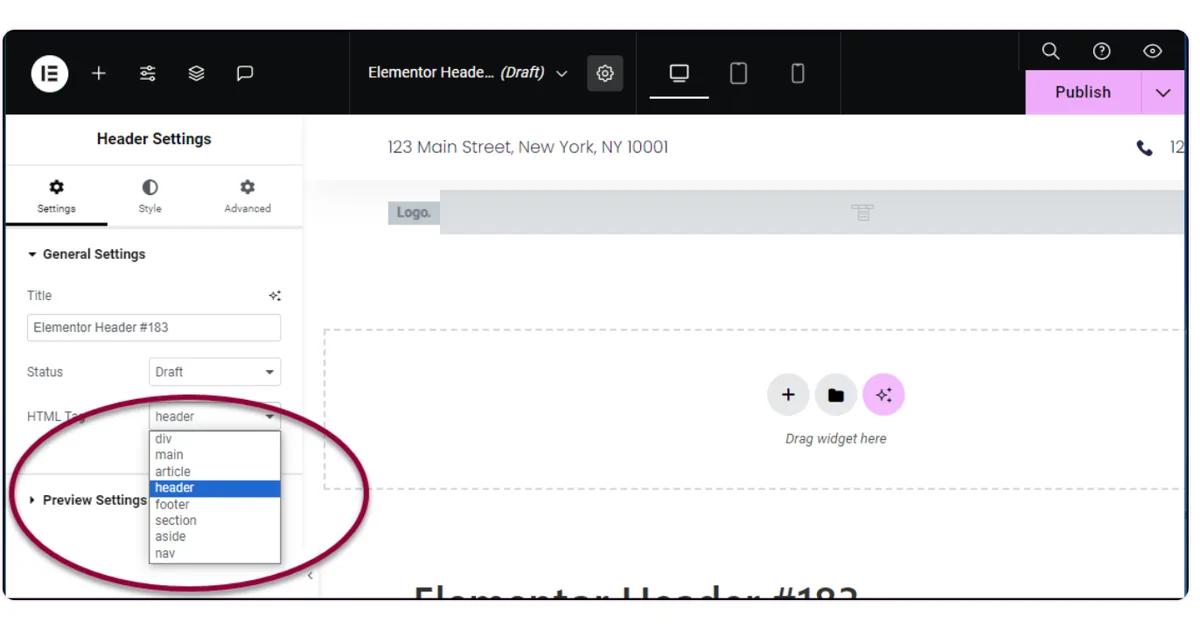
Set the HTML tag to header
Open the template’s settings (the cog in the top bar) and set HTML Tag to header. Screen readers use it to find the site header.
Do the same with footer later, and use nav on the menu wrapper if your layout allows.
Need custom styling the controls don’t offer, such as a hover underline on menu links? Add it in the element’s Custom CSS field. Our guide to adding custom CSS in WordPress explains where each method lives and which one wins.
Step 3: Publish with display conditions
Click Publish. Elementor asks where the template should appear. Click Add Condition, leave it on Include → Entire Site, then click Save & Close. That is the right setting for a site’s main header.
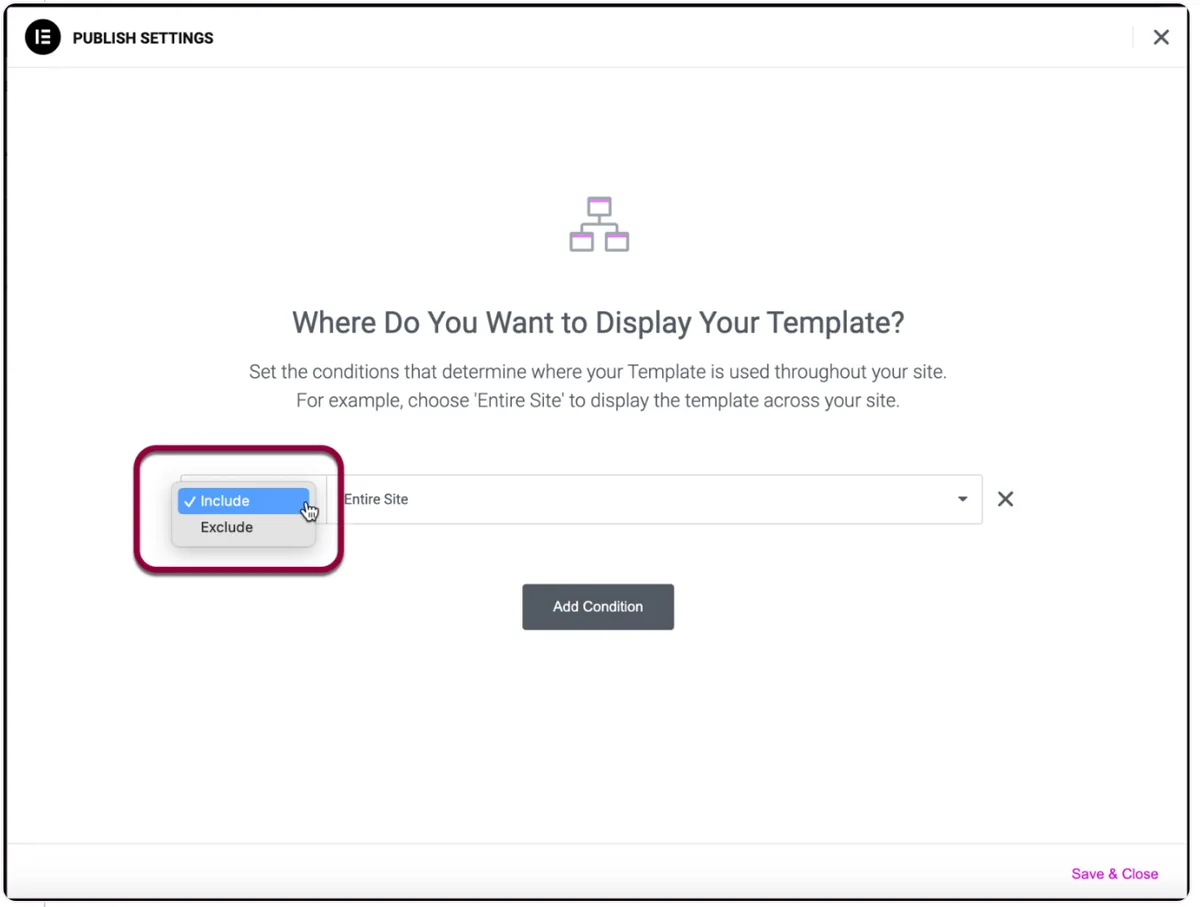
The left dropdown switches between Include and Exclude. The right one narrows the target.
Per Elementor’s display conditions reference, you can target the Front Page, all Posts, posts In Category, specific Pages, child pages, the 404 Page, archives, search results and WooCommerce shop or product pages.
You can stack several conditions on one template. To change them later, open the template and use the arrow next to Publish → Display Conditions, or click Edit Conditions on its card in the Theme Builder.
💡 Tip: If another header already targets the same pages, Elementor shows a conflict warning in this window. Don’t click past it: two headers fighting over one page cause headers that seem to change at random.
Step 4: Build the Elementor footer template
Go back to the Theme Builder and click the plus sign on the Footer card. Same flow: optional library template, design, Publish, Entire Site.
A footer is a directory, not a billboard. Three or four columns usually cover it: a short about line with the logo, key pages, contact details, and legal links (privacy, terms). Set the HTML Tag to footer.
Here is why you should never skip this step, even if you like your theme’s footer. Elementor’s theme compatibility notes warn that many themes open a wrapper div in the header and close it in the footer.
Replace only one of the two and those tags can mismatch, which breaks the page layout. Themes that register Elementor’s locations avoid the problem, but if you are unsure, replace both.
Step 5: Make it a sticky header (V3 and V4)
The method depends on which editor built your header container. Elementor’s sticky header guide (updated October 2026) documents both, and they are not interchangeable.
Sticky header in Elementor V3 (classic containers)
- Select the outer header container, then open Advanced → Motion Effects.
- Set Sticky to Top.
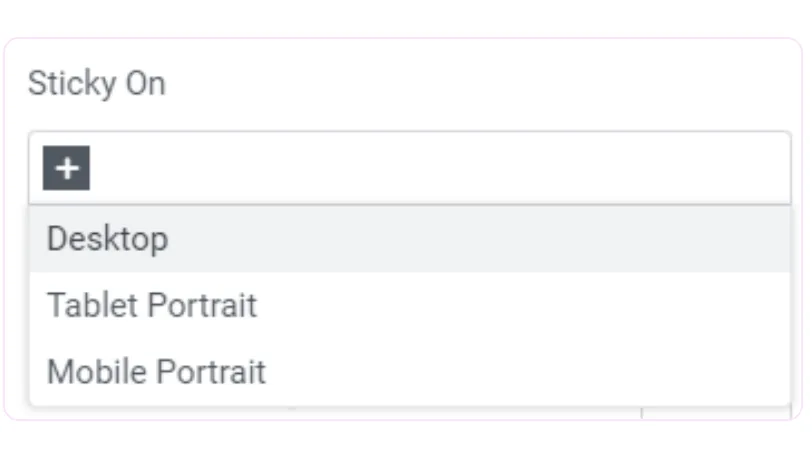
- Under Sticky On, choose Desktop, Tablet Portrait and/or Mobile Portrait.
- Optional: Offset sets the gap from the top of the viewport once stuck; Effects Offset sets how many pixels the visitor scrolls before sticky styles kick in.
- Keep Stay In Column on No for a main site header.
Effects Offset does nothing on its own. It only matters once you add CSS to the sticky element for the stuck state. For a frosted-glass version, our tutorial on a blurred animated sticky header in Elementor walks through the styling.
Sticky header in Elementor V4 (Atomic Editor)
V4 uses native CSS position: sticky, which only sticks inside its parent section. Set the header itself to Sticky and it scrolls away as soon as its section ends. Elementor’s fix is a fixed header plus a spacer:
- Add an outer wrapper container: Style → Size, Width 100%, Min height equal to your header height (for example 80px). Position stays Static.
- Put the inner header container inside it, Width 100%, holding the logo, menu and button.
- On the inner container, set Style → Position to Fixed, Top to 0 (type the zero, don’t leave it blank) and Z-index to 99.
The wrapper reserves the header’s height in the page flow, so content doesn’t slide under it. Common mistake: applying Fixed to the outer container, which hides the top of every page behind the header.
A sticky header that changes height on scroll can also move content around. If layout shift is already on your radar, our guide to passing Core Web Vitals in WordPress shows how to measure CLS before and after.
How to use a different header on some pages
Keep the main header on Entire Site, then create a second header for the exception. A stripped-back landing page header (logo plus phone number) is the usual case.
Give it a narrower condition, such as Include → Pages → your landing page.
The cleaner option is to also add Exclude → that page to the main header, so the two templates never compete. Then check the page in a private window to confirm which header actually renders.
| Goal | Condition to use |
|---|---|
| One header everywhere | Include → Entire Site |
| Different header on one landing page | New header: Include → Pages → that page. Main header: add Exclude → that page |
| Header for blog posts only | Include → Posts (or In Category for one category) |
| Store header with cart icon | Include → WooCommerce (shop, product and category pages) |
| No header at all on a page | Set that page’s layout to Elementor Canvas |
Want to show or hide single elements inside one header, such as a “Log in” link only for logged-out visitors? That is element-level visibility, a different tool.
Our roundup of dynamic visibility and condition plugins compares the options, and blog layouts are covered in our Elementor Pro blog tutorial.
How to check it worked
- In the Theme Builder, both cards show a green dot, and the Instances label lists where each one is used.
- Open the home page, a blog post, an archive and the 404 page in a private window. The same header and footer appear on all four.
- View the page source and confirm one
<header>and one<footer>element, not two of each. - On a phone, the hamburger appears at your chosen breakpoint and the sticky header stays slim.
- Scroll a long page: the header sticks for the whole page, not just the first section.
If the theme’s old header still shows anywhere, jump to the next section before you start redesigning anything.
What breaks and how to undo it
Elementor’s help center lists the usual suspects for a missing header, and they match what shows up in support threads.
| Symptom | Likely cause | Fix |
|---|---|---|
| Theme header still shows | Template has no display condition (gray dot) | Edit Conditions → Include → Entire Site → Save & Close |
| Header missing on one page | Page layout is Elementor Canvas | Page Settings → Page Layout → Default or Elementor Full Width |
| Changes don’t appear live | Template saved as draft, or cached CSS | Click Publish; then Elementor → Editor → Tools → Clear Files & Data, and purge your cache plugin or CDN |
| Header gone on mobile only | Responsive “Hide on Mobile” switched on | Advanced → Responsive → turn off the Hide toggles |
| Layout breaks below the header | Only header or footer replaced on a theme without Elementor locations | Build the matching footer (or header) template too |
| V4 header scrolls away | Native sticky is container-bound | Use the Fixed inner container plus Static wrapper method |
| Header sits behind page content | Z-index too low | Set the header container’s Z-index to 99 |
To undo everything: open the Theme Builder, click the three dots on the header card and choose Trash, or simply remove its display conditions. The theme’s own header returns.
Export the template as a .json file first if you might want it back.
Frequently Asked Questions
Is the Elementor Theme Builder free?
No. Custom header and footer templates in the Theme Builder need Elementor Pro, and free installs only preview the Pro site parts. On free Elementor, a separate free plugin such as Ultimate Addons for Elementor adds a header and footer builder with its own display rules.
Where is the Theme Builder in the new Elementor menu?
Since January 2026 it sits under Elementor, Editor, Templates, Theme Builder. With Elementor Pro active there is also a Theme Builder shortcut directly in the Elementor menu. Inside the editor, click the Elementor logo and pick Theme Builder, or press Ctrl or Cmd, Shift and E.
Why is my Elementor header not showing?
Usually the template has no display condition, the page uses the Elementor Canvas layout, or the template is still a draft. Check for a green dot on the Theme Builder card, switch the page layout to Default, publish the template, then clear Elementor files and data and your page cache.
How do I make a sticky header in Elementor V4?
Wrap the header in an outer container with Static position, full width and a minimum height matching the header. Set the inner header container to Position Fixed, Top 0 and Z-index 99. Native sticky in V4 only sticks inside its own section, so it scrolls away.
Can I use a different header on specific pages?
Yes. Create a second header template and give it a narrower display condition, such as one landing page or one category of posts. Add a matching Exclude rule to your main Entire Site header so the two never compete, then check the page in a private window.
Will an Elementor header work with my theme?
It works with most themes that follow WordPress coding standards. Themes that register Elementor locations integrate cleanly. With other themes, replace the header and footer together, because some themes open a wrapper in the header and close it in the footer, and replacing only one breaks the layout.
How do I hide the header and footer on a landing page?
Open the page in Elementor, go to Page Settings and set Page Layout to Elementor Canvas. Canvas hides the theme and Theme Builder header and footer on that page only. Alternatively, keep the layout and give the page its own minimal header through a display condition.
Can I reuse my Elementor header on another website?
Yes. In the Theme Builder, open the three-dot menu on the header card and choose Export to download a JSON file. On the other site, use the Import icon in the Theme Builder to add it, then open its card and set or confirm the display conditions before you rely on it.
Should you build your header in the Theme Builder?
- Use the Theme Builder if: you already pay for Elementor Pro and want full control of the header, footer and per-page exceptions from one screen.
- Stay with your theme’s header if: it already does what you need. A Blocksy or Astra header builder means one less template to maintain.
- Use the Site Editor instead if: you run a block theme and no Elementor Pro licence; our beginner’s guide to full site editing covers header template parts.
- Skip the sticky header if: visitors rarely need the menu mid-page. A slim static header is better than a sticky one that covers a third of a phone screen.
Our pick for most StyleMyWP readers: one header and one footer on Entire Site, a V3 Motion Effects or V4 Fixed sticky header on desktop, and a slimmer version on mobile.
For widgets that go beyond the core set, browse our list of the best Elementor addons for WordPress.
Last updated November 2026.