


To create a custom post type in WordPress, you register a new content type with a key and labels. WordPress then gives it its own admin menu, edit screen and URLs.
Below are all three routes: ACF’s Post Types screen, Custom Post Type UI, and register_post_type() in code. Then you will display the new type, check it, and fix the 404 everyone hits once.
⚡ Quick answer
- Best for: portfolios, team directories, testimonials, events, listings or any content that has its own fields and should not sit among blog posts.
- Skip it if: a category or tag would do. If the content looks like a post and shares the same fields, a new post type only adds an admin menu to maintain.
- You need: administrator access, a backup, and either ACF (free), Custom Post Type UI (free), or SFTP access for a small site plugin.
- Our call: already using ACF? Register the type there. Building for the long term or shipping to clients? Put the code in a site plugin, because the post type then survives any theme or plugin change.
Contents
- What is a custom post type, and when do you need one?
- What you need before you start
- Method 1: Create a custom post type with ACF
- Method 2: Use the Custom Post Type UI plugin
- Method 3: Register a custom post type with code
- The register_post_type arguments that matter
- How to display your custom post type
- How to check it worked
- What breaks and how to undo it
- Frequently Asked Questions
- Which method should you use?
What is a custom post type, and when do you need one?
WordPress ships with five built-in post types: post, page, attachment, revision and menu. A custom post type is a sixth, seventh or tenth one that you define yourself, such as Books, Projects or Team Members.
Per the WordPress Plugin Handbook, a registered custom post type gets its own top-level admin screen. Each entry is still a row in the same posts table, tagged with a different post_type value.
That is why custom post types are cheap. They reuse the editor, revisions and featured images you already have, and add separation: a client editing Projects never scrolls past blog drafts.
| Use a custom post type when | Use a category or tag when |
|---|---|
| Entries need their own fields (price, client, location, date) | Entries are ordinary articles grouped by topic |
| They need their own URL base, such as /projects/ | The /blog/ or /category/ URL is fine |
| They need their own template or archive layout | The normal post layout works |
| Editors should manage them in a separate menu | Mixing them with posts in the admin is fine |
Custom post types and custom fields usually travel together. If you have not set up fields before, start with our ACF tutorial for beginners, then come back here to give those fields a home.
What you need before you start
- Administrator access to wp-admin. Registering a post type is a site-level change.
- A fresh backup. Nothing here deletes content, but rewrite changes can break URLs. Any tool from our WordPress backup plugins roundup will do.
- A name and key decided up front. The key is permanent in practice, so pick it before you add content (more on that below).
- For the code route: SFTP or a file manager to add a small plugin file, or a code snippet plugin.
Write down three things first: the plural label (Books), the singular label (Book) and the key (acme_book). Every method asks for exactly these.
⚠️ Pick the key carefully. The key must be 20 characters or fewer, using lowercase letters, numbers, dashes and underscores. WordPress stores it on every entry, so renaming it later means editing the database.
Method 1: Create a custom post type with ACF
Advanced Custom Fields has registered post types since ACF 6.1, and the feature is in the free plugin. If ACF already runs your fields, this is the shortest path: post type and fields live in one place.
- Go to ACF → Post Types and click Add New.
- Fill in Plural Label (Books) and Singular Label (Book). ACF generates the Post Type Key from the singular label; edit it to add your prefix.
- Leave Public on (the default) if visitors should see the entries. Turn on Hierarchical only if entries need parents and children like pages.
- Switch on Advanced Configuration to reach the tabs: Supports (featured image, excerpt, author), Visibility (menu icon and position), URLs (archive and permalink slug), Permissions and REST API.
- Click Save Changes, then use the Add fields to link that appears to create a field group already pointed at the new type.
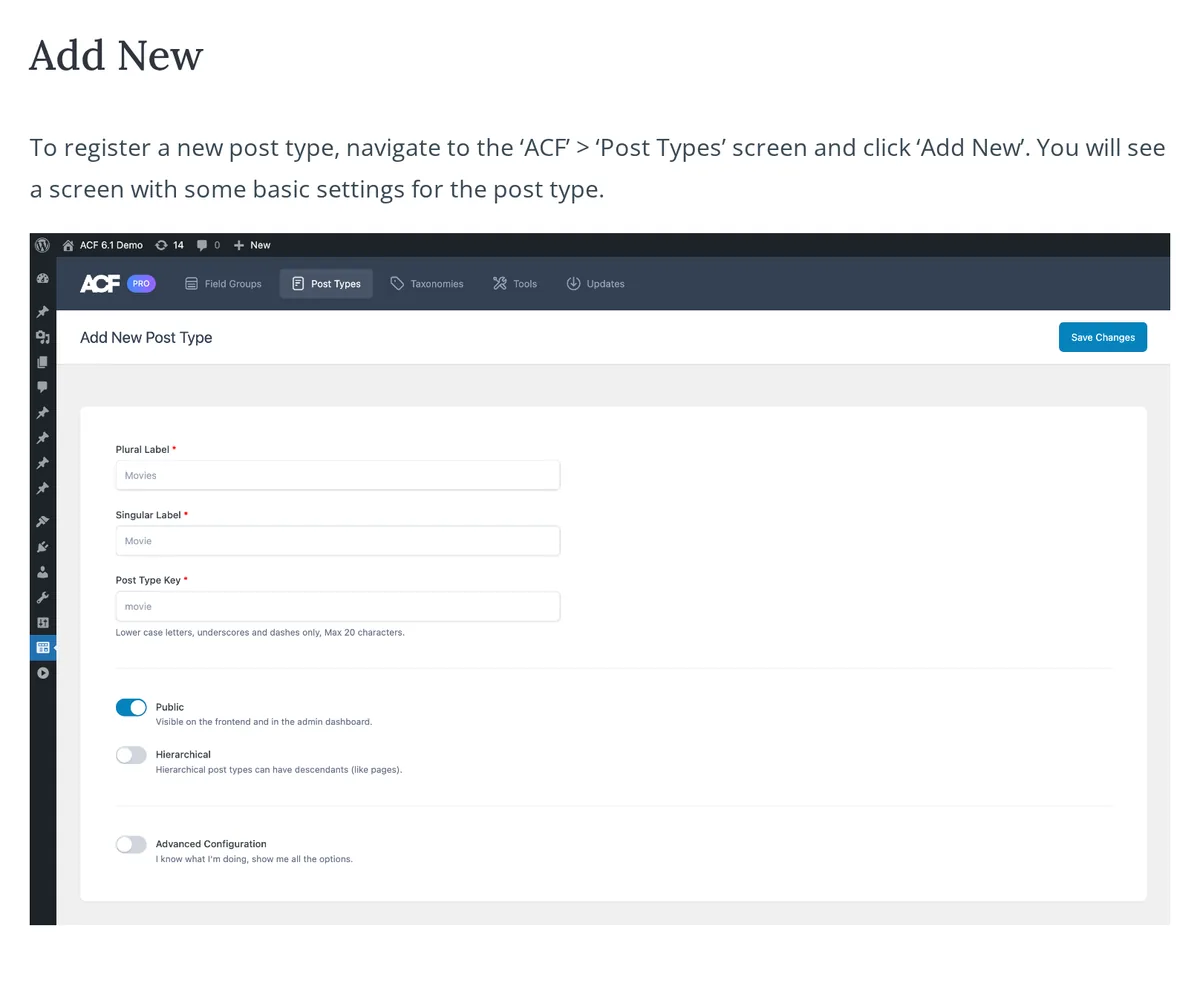
According to the ACF post type documentation, Show in REST API is on by default and is required for the block editor. Leave it on unless you have a reason. Turn it off and editors get the old classic screen.
Two ACF details matter later. The Active toggle switches a post type off without deleting it. And ACF → Tools → Export → Generate PHP turns it into native register_post_type() code for a plugin.
The catch: while the post type lives in ACF’s settings, deactivating ACF unregisters it. Entries stay in the database but vanish from the admin and return 404. Secure Custom Fields, the WordPress.org fork, behaves the same.
Do this if ACF is already on the site and you want fields and post types managed together. Our comparison of custom field plugins covers the alternatives if you are still choosing.
Method 2: Use the Custom Post Type UI plugin
Custom Post Type UI (CPTUI) is a free plugin that does one job: a form for registering post types and taxonomies. WordPress.org lists 1+ million active installations and version 1.19.3, which requires WordPress 6.6 and PHP 7.4 or higher.
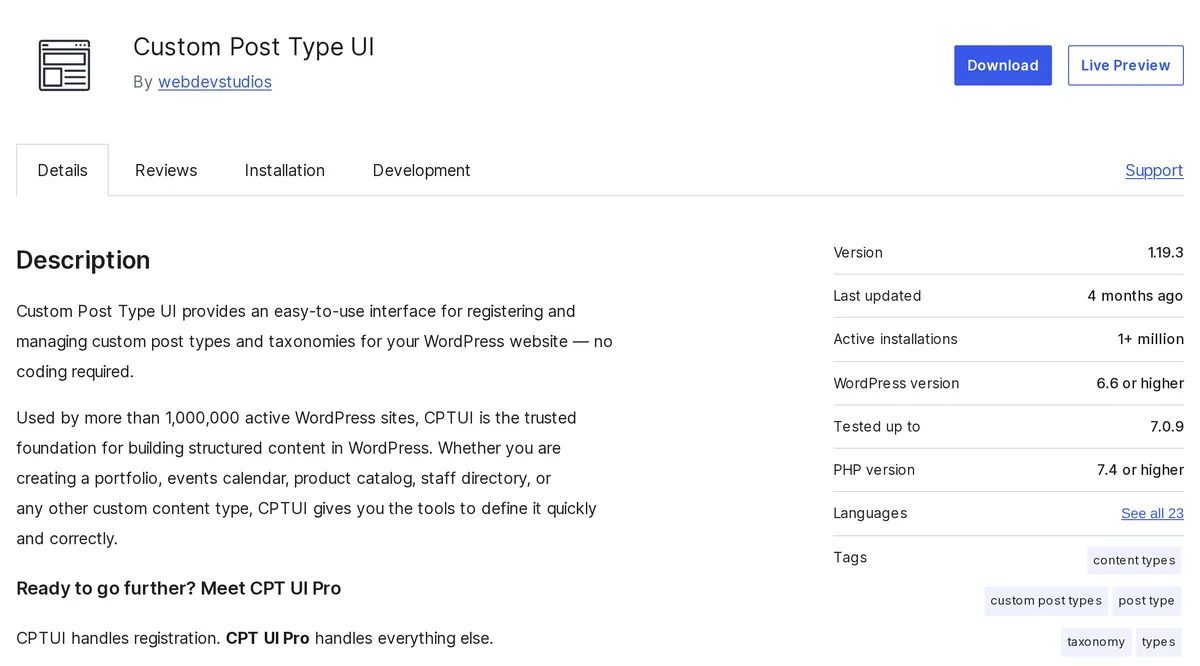
- Install and activate Custom Post Type UI from Plugins → Add New.
- Open CPTUI → Add/Edit Post Types.
- Enter the post type slug (your key), the plural and singular labels, and use the link to populate the remaining labels.
- Scroll to the settings: set Has Archive to true if you want a listing page, pick a menu icon, and tick the Supports boxes you need.
- Save the post type. The new menu appears in the sidebar next to Posts and Pages.
The best feature is CPTUI’s Get Code tab. It prints the PHP for everything you built, so you can move it into a plugin and drop CPTUI later.
The catch: the free plugin only registers. Per its own FAQ, front-end display tools are in the paid CPT UI Pro add-on, so you still need a theme template, a block theme template or Elementor to show entries.
Skip it if ACF, Pods or Meta Box is already installed. A second plugin doing the same registration is overhead. Our roundup of custom post type plugins compares all of them, including the paid builders.
Method 3: Register a custom post type with code
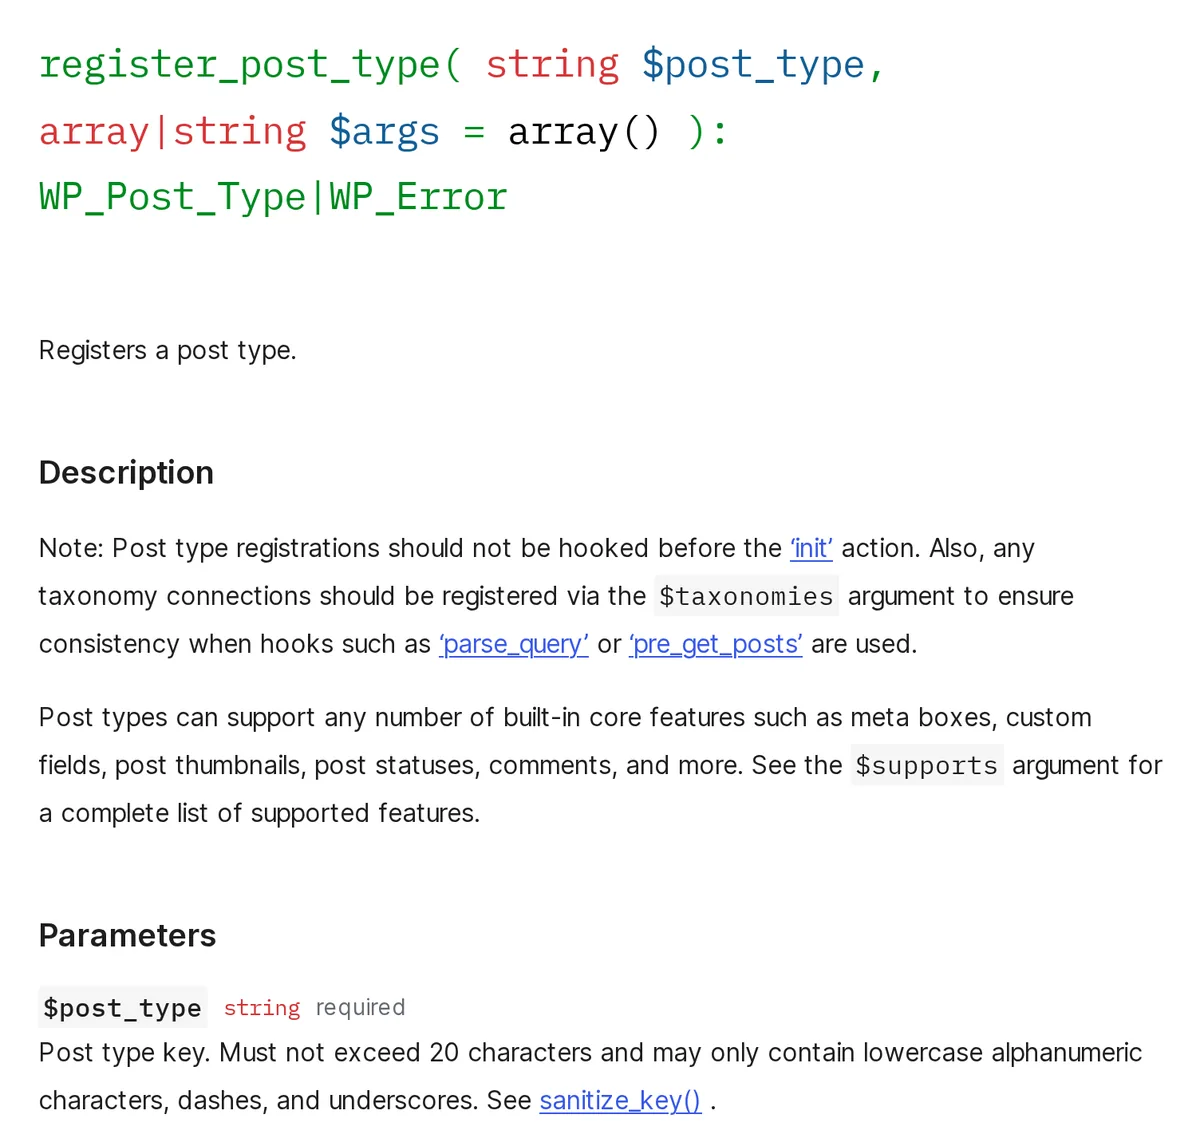
Every plugin above calls one core function. The register_post_type() reference says registrations should not run before the init action, and the handbook recommends a plugin over a theme so content survives a theme switch.
Step 1: Create a small site plugin
Create a folder wp-content/plugins/acme-content/ with a file called acme-content.php. A plugin only needs a header comment with its name:
<?php
/**
 * Plugin Name: Acme Content Types
 */
Activate it from the Plugins screen once the code below is in place.
Step 2: Register the post type on init
function acme_book_cpt() {
    register_post_type( 'acme_book', array(
        'labels'       => array(
            'name'          => __( 'Books', 'acme' ),
            'singular_name' => __( 'Book', 'acme' ),
        ),
        'public'       => true,
        'has_archive'  => true,
        'rewrite'      => array( 'slug' => 'books' ),
        'show_in_rest' => true,
        'supports'     => array( 'title', 'editor', 'thumbnail' ),
    ) );
}
add_action( 'init', 'acme_book_cpt' );
Paste that below the header.
That gives you a public Books menu, single URLs at /books/book-title/, an archive at /books/, and the block editor. Leave out show_in_rest and it defaults to false, which means no block editor.
Step 3: Flush permalinks once on activation
New post types need fresh rewrite rules, or every Book URL returns 404. The reference shows the pattern: register the type, then call flush_rewrite_rules() in the activation hook only. Add this to the same file:
register_activation_hook( __FILE__, 'acme_content_activate' );

function acme_content_activate() {
    acme_book_cpt();
    flush_rewrite_rules();
}
Flushing is an expensive operation, so never run it on every page load. No hook? Click Save Changes under Settings → Permalinks once.
Prefer a code snippet manager over a plugin folder? That works too; our WordPress code snippet plugins guide compares the safe ones. Must-use plugins also work, with one trap: activation hooks never fire there, so flush from Permalinks by hand.
💡 Tip: Avoid registering post types in a theme’s functions.php. Switch themes and the menu disappears with every URL. Our custom CSS guide covers child themes, but a plugin is the better home here.
The register_post_type arguments that matter
The function accepts dozens of arguments. Most sites only ever touch the ones below. Defaults come from the WordPress Code Reference.
| Argument | What it does | Default | Set it to |
|---|---|---|---|
public | Shows the type in admin, front end, search and menus | false | true for anything visitors see |
show_in_rest | Exposes it to the REST API and the block editor | false | true, unless you want the classic screen |
has_archive | Creates a listing page; a string sets its slug | false | true or a slug like books |
rewrite | Controls the URL base | the post type key | array( 'slug' => 'books' ) |
supports | Edit screen features: title, editor, thumbnail, excerpt and more | title and editor | only what editors need |
hierarchical | Allows parent and child entries like pages | false | true only with page-attributes in supports |
menu_icon | Admin menu icon (Dashicons class or SVG data URI) | posts icon | a Dashicons class such as dashicons-book |
capability_type | Base for edit, publish and delete capabilities | post | a custom string only if roles need separate rights |
Common mistake: adding thumbnail to supports but seeing no featured image box. The reference notes the theme must also support post thumbnails.
Another trap is a generic key. The handbook warns that product may clash with another plugin, and two types with one key cannot both work. Use a short prefix.
How to display your custom post type
Registering a post type does not decide how it looks. WordPress falls back to your normal single and archive templates until you build better ones.
Classic themes: template files
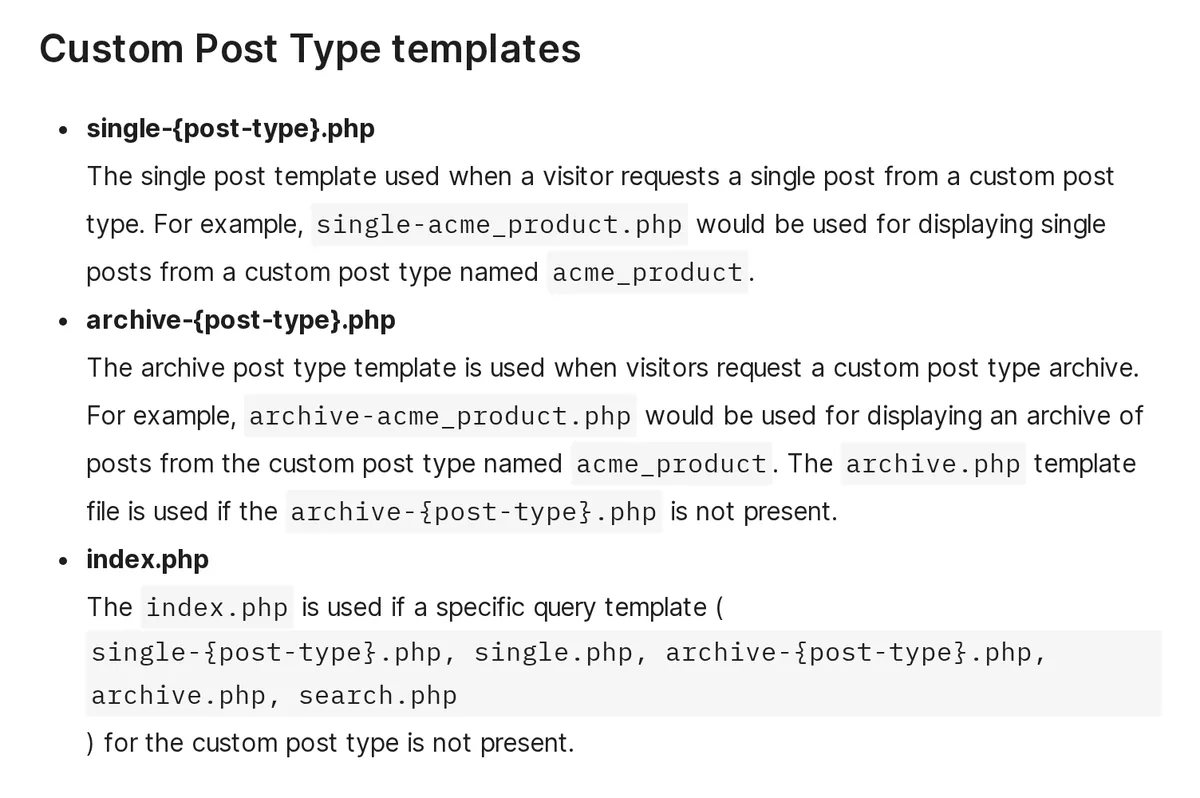
Classic themes look for single-{post_type}.php for one entry and archive-{post_type}.php for the listing. For acme_book that means single-acme_book.php and archive-acme_book.php, placed in a child theme.
Block themes: the Site Editor
Block themes handle this in Appearance → Editor → Templates. Click Add Template and pick your post type for its single entries or its archive. Our Full Site Editing guide walks through templates and template parts.
Elementor: enable it, then build a template
Elementor only offers its editor on the post types you allow. Per Elementor’s help centre, go to Elementor → Settings and tick your new type under Post Types, then save.
For one layout for every entry, use Elementor Pro’s Theme Builder: create a Single Post template, publish it, and set the display condition to your post type. Our walkthrough on creating a single post layout with Elementor covers the build.
ACF fields drop into that template with Dynamic Tags. When a field is sometimes blank, our guide to hiding a widget if an ACF field is empty stops empty headings and buttons from showing.
One more thing: a new post type does not appear on the blog home page or in standard archives. The handbook says you need the pre_get_posts hook to mix it into the main query.
How to check it worked
- The admin menu shows up with your label and icon, and Add New opens the block editor (if it opens the classic screen,
show_in_restis off). - Publish a test entry and open it. A 404 means the rewrite rules need flushing: Settings → Permalinks → Save Changes.
- Open the archive URL, such as
/books/. A 404 there with working single pages meanshas_archiveis false. - Check the REST route at
/wp-json/wp/v2/acme_book(or yourrest_base). JSON means the editor and headless tools can see it. - Check your SEO plugin’s sitemap settings and include the new type if you want it indexed.
What breaks and how to undo it
| What breaks | Why | How to undo it |
|---|---|---|
| Every entry returns 404 | Rewrite rules were not flushed after registering | Settings → Permalinks → Save Changes |
| Menu and entries vanish | The plugin or theme registering the type was deactivated or switched | Reactivate it, or move the exported PHP into a site plugin; content was never deleted |
| Classic editor instead of blocks | show_in_rest is false | Turn on Show in REST API (ACF, CPTUI) or set it to true in code |
| Entries load the wrong content or 404 | Another plugin or theme already uses the same rewrite slug, such as /books/ | Change your rewrite slug to something more specific, then flush permalinks |
| Two plugins fight over one type | Same key registered twice after an import | Deactivate the old registrar, as ACF advises after a CPTUI import |
Removing a post type never deletes its entries. They wait in the database under the old key, and re-registering the same key brings them straight back. Changing the key is what strands content.
Frequently Asked Questions
Can I create a custom post type without a plugin?
Yes. Add a register_post_type() call on the init hook inside a small site plugin, set public and show_in_rest to true, and save permalinks once. It takes about twenty lines of PHP. Avoid functions.php in a theme, because switching themes makes the post type and its URLs disappear.
Does ACF free let you create custom post types?
Yes. Since ACF 6.1 the free plugin registers custom post types and taxonomies under ACF, Post Types, with no PRO licence needed. You set the plural label, singular label and key, then use Advanced Configuration for archives, URLs, supports and REST API settings.
Is Custom Post Type UI still worth using?
It is a solid free registrar with over a million active installs, and its Get Code tab exports clean PHP. It does not display content on the front end, though. If ACF, Pods or Meta Box is already installed, use that instead of adding a second plugin.
Why does my custom post type show a 404 error?
The rewrite rules were not refreshed after you registered the type or changed its slug. Go to Settings, Permalinks and click Save Changes. If single entries work but the archive does not, has_archive is set to false, so switch it on and save permalinks again.
What happens to my posts if I deactivate the plugin that created the post type?
The entries stay in the database, but WordPress no longer recognises the post type, so the admin menu disappears and URLs return 404. Reactivate the plugin, or register the same key in code, and everything returns. Export the PHP first if you plan to switch.
Should I put custom post types in my theme or a plugin?
Use a plugin. The WordPress Plugin Handbook recommends this so your content stays portable when you change themes. A theme should control how entries look through templates, while the registration lives in a site plugin, a must-use plugin, ACF or CPTUI.
How do I make a custom post type use the block editor?
Set show_in_rest to true. In code it defaults to false, which loads the classic editor. In ACF the Show in REST API setting is on by default, and CPT UI exposes the same option. Make sure editor is also included in the supports list.
Can I use Elementor with custom post types?
Yes. Enable the type under Elementor, Settings, Post Types to edit entries with Elementor. To design every entry at once, build an Elementor Pro single template in the Theme Builder and set its display condition to your post type, then pull fields in with Dynamic Tags.
Which method should you use?
- Use ACF if: it already manages your fields. One plugin, one screen, and Generate PHP gives you an exit route.
- Use Custom Post Type UI if: you want a free, single-purpose registrar and no fields plugin. Copy its Get Code output somewhere safe.
- Use code if: you build client sites, work in Git, or want zero plugin dependency. A twenty-line site plugin outlives every theme.
- Skip custom post types if: a category or tag already separates the content well enough.
Our pick for most StyleMyWP readers: register the type in ACF while you design the content model, then export it to a site plugin before launch. Next, add fields with our step-by-step ACF guide.
Last updated November 2026.




[…] its own UI, so you may not need one of the dedicated custom post type plugins alongside it. Our step-by-step custom post type tutorial shows that ACF screen next to the code route. Its .org rating sits at 4.5 from 1,438 reviews, the […]