Speeding up your website is important, and using WebP images can help a lot.
This guide will show you how to enable WebP uploads in XAMPP so you can use this efficient image format while working on your local site.
Just follow these simple steps to make sure your web projects run fast and smooth.
Causes of WebP Upload Issues in XAMPP
WebP is a popular image format, but sometimes, uploading WebP images in XAMPP may not work due to missing extensions, incorrect settings, or server restrictions. Below are the common causes and how to fix them.
GD or Imagick Extension Not Enabled: PHP requires the GD or Imagick extension to process WebP images. If they are disabled, WebP won’t work.
Older PHP Version: WebP support in GD was introduced in PHP 5.5+. If you’re using an outdated version, it may not support WebP.
Incorrect MIME Type Handling: If your upload script does not allow image/webp, the server will reject WebP uploads.
File Size or Upload Limits: PHP has upload_max_filesize and post_max_size settings in php.ini. If WebP images exceed these limits, the upload will fail.
Permissions Issues: The uploads folder must have proper write permissions (chmod 755 or 777 on Linux) for PHP to save the WebP file.
Apache Not Restarted After Changes: If you enable GD or Imagick but don’t restart Apache, the changes won’t take effect.
Corrupt WebP File: If the uploaded WebP file is damaged or incorrectly formatted, PHP may not recognize it.
Key Steps:
To upload WebP images in XAMPP, you need to make sure PHP has the GD library enabled with WebP support. Here’s how to do it:
1. Locate the php.ini File:
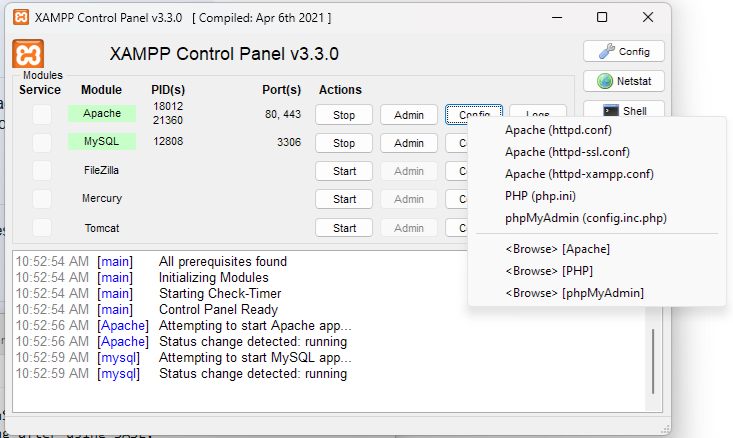
- Open your XAMPP Control Panel.
- Click the “Config” button next to Apache.
- Select “PHP (php.ini)”.
2. Enable the GD Library:
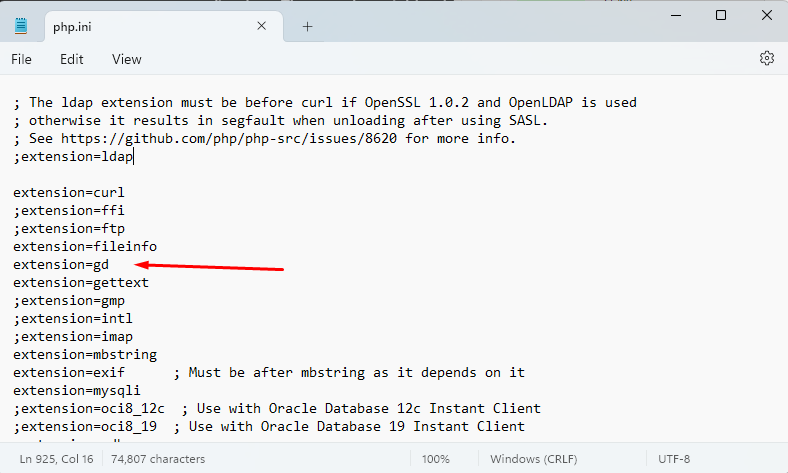
- Open the php.ini file and look for “extension=gd”.
- If the line starts with a semicolon (;), remove it. This uncomment the line, enabling the GD library.
- Ensure that the enabled GD library supports WebP, which is usually available in modern PHP versions.
3. Save and Restart:
- Save the changes to the php.ini file.
- Open the XAMPP Control Panel, stop the Apache server, and then start it again.
4. Verify:
After restarting, try uploading a WebP image through your web application (e.g., WordPress). If the upload is successful, WebP support is enabled.
Conclusion
Enabling WebP uploads in XAMPP is easy. You just need to change a simple PHP setting by turning on the GD library with WebP support.
This lets your local setup handle WebP images, making your website faster and better for users. Just follow the steps, and you’ll be able to use WebP without any trouble.

